Tutorial 1


Step 1 - Creating the Document
I would advise creating whatever document you want, whatever size you want, obviously this method works best with a type of parchment texture in the background, the darker the better.

This will allow the texture to come through in the blood spots, and of the course this tutorial works best when you are attempting to create a moody, grunge, dirty looking piece, although I suppose you could use it on others as well.

Step 2 - Creating the Blood
Begin with a colour with the following settings:
R: 126
G: 18
B: 7

Now this will be darkish reddish type colour, I would begin by selecting a smallish (last two or three smallest brushes) out of the brush options. Create a new layer, name it BLOOD, and begin to paint on that layer.

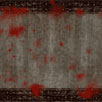
Now go ahead and brush the blood spots, beginning with a light depress of the mouse button, to create the idea of a large blood spots, then proceeded by several smaller blood spots, as if the blood were first dropping and this dripping smaller blobs.

Once you have done this you should take the eraser and liberally erase a large amount of what you have done, play around with it until you have created what looks to you like blood spots.

Then, and this is the tricky bit, use the smear tool, on the smallest, or second to smallest brush setting. Use it to smear up all your blood spots, so it appears as if they are messed about, and have fallen haphazardly (this will also be important for the next step, as the semi-transparency this creates, will allow the blending change of the layer to create realistic looking blood.)

You should now have something that resembles the picture to the left.

Step 3 - Finishing touches
Now you should take the blood layer and reduce the opacity to around 55%

Then you should change the layer blending option to Colour Burn.

Now you should have something that resembles the picture
to the left, just add some text and some pipes and voila, instant grunge.

Incidently the text was ceated using hand editing with the eraser to make it look jagged, and the creation of each letter seperately to allow variation in placement.

Finally the text was change to a colour burn blending with 85% opacity.

If your blood doesnt turn out like you want, play around with it for a while, try different opacity settings, perhaps even different blending, and be prepared to use the smear tool a fair amount, as it will allow the blood to look more realistic. And finally, the effect you are going for is dried caked, old blood, so keep that in mind and see what you end up with.

Next tutorial should be on creating tiling parchment textures, and working with brass rivet or pipe type graphics.